froMOS Business Management System (BMS)
Customer Relation Management
User Documentation
froMOS-BMS - Overview CRM
froMOS-BMS - General Classification
froMOS-BMS software system is dedicated to support the data management inside one organization and also in interaction of many different organizations. The system provides a user-friendly and customizable user interface with different data-level connections inside databases.
The main target of froMOS-BMS is to enter structured information data into databases, to make this data searchable and representable in tree-lists, forms and specific reports under each users security level specification with encrypted connections via Internet.
The main panel of the froMOS Customer Relation Managenent module contains a tree-view area, a toolbar and a statusbar:
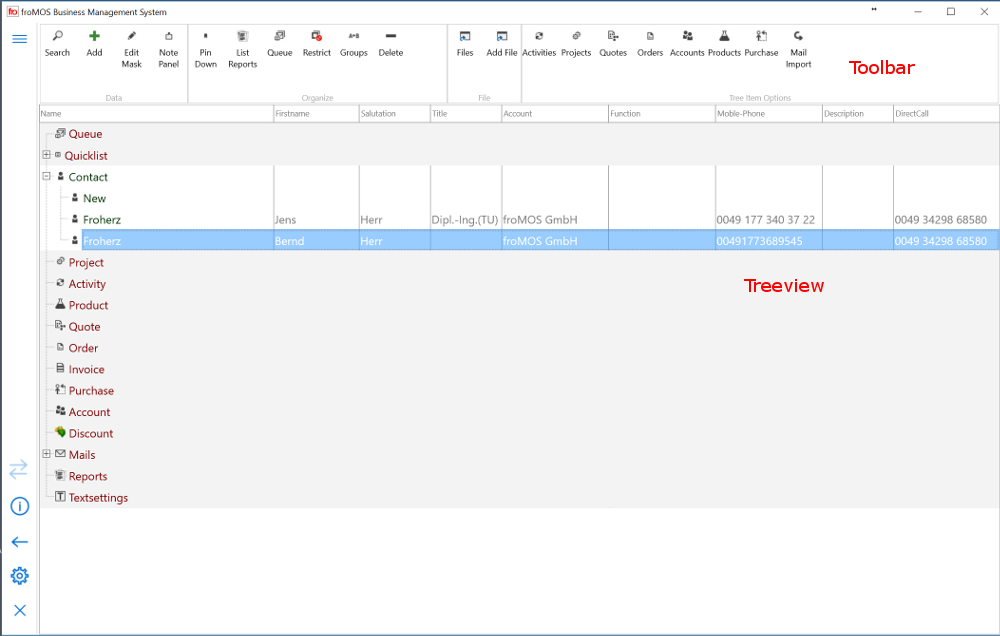
This panel is customizable, that in reality it can have a different appearance as the picture above.
froMOS-BMS - Login
froMOS-BMS requires a login before using the system with secured and encrypted connections.
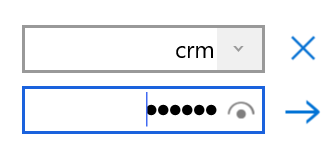
froMOS-BMS provides the actual operation system username as start-up username.
The password for the test-application is "fromos". Use username "crm" to enter directly into the Customer Relation Management module and username "pos" for the Point of Sales module.
Each user has an access level policy connected, that all data access and data entry is limited to this user access level. So it is possible, that different organizations can share the same data with different access levels over the internet.
A User can change his password by entering the  . The old and new password have to be
provided.
By login the user will get only access for data according of his assigned usergroup data access policy.
froMOS-BMS - Tree-View data structure
Tree-View data structure description
The main data representation structure of froMOS Customer Releation Management is a treeview. Data that belongs to one context is represented as single entity, like account, quote, order. The connections between these entities are best represented by the tree structure. The example pictures shows the contact "Froherz" belongs to the account "froMOS GmbH".
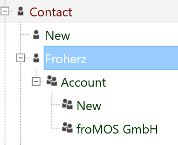
If the Contact line of the treeview is clicked for one contact entry, the toolbar is changing. It shows only buttons, that are relevant for the selected contact area. In the standard configuration buttons for activities, projects, quotes, orders, accounts, products and purchase are available.
 .
.
By clicking one of these toolbar buttons, the treeview is extended and all entity data for the selected button is listed below the active contact.
This is a general behaviour relevant for each entity data, listed in the treeview. Every time an entity-data line is clicked, the toolbar buttons change to the relevant buttons for the active entry. The data, which is connected to the selected data entry can be selected in the sub-tree by pressing one of these data level buttons.
Each tree-entity can be assigned several different sub-entities. Mostly the assignment is following an N:N assignment, that means for example an account can have many activities assigned, but also an activity can have many accounts assigned.
With a treeview structure the data representation becomes more flexible. By starting opening data in the tree, beginning from different top level entities, one will get also a different view for the data.
So for example, if an specific order is interesting, we would start to select first data from the top level order entry of the tree, before we select for example relevant and assigned activities in the sub tree data of the relevant order. If we will get a phone call for example from a person, that is saved in our contacts, we would select directly from the starting level contact, to get the quick access for the contact data and its assignments.
We would start with products, if we like to find quotes or orders for one specific product.
We can start with activities, to list first for example all inquiries of the last month, to get listed a sales state or to get direct access for quotes assigned to this inquiry activities.
Every time, if we like to get data access in the treeview, we start with a search from the criteria mask and by selecting the right top level entry in the treeview first, the time for opening the relevant information can be influenced.
All entity names and data-connections are free customizeable by froMOS system administrators.
Standard Entities
froMOS-BMS has a set of standard entities configured. Completely new entities can be added by system operators. The existing entities in generally meet the requirements of a small and medium-sized company.
Entities represent tables from a database, like normal tables with columns and rows. The columns describe the available fields and the rows hold the data for each column. An entity can be connected to only one database table, but also to some configured combinations of several database tables.
| Entity-Name | Description |
|---|---|
| Account | Customer data like customer names and addresses, phone numbers, customer classification fields |
| Contact | Contacts assigned to accounts, description for employees of a customer, the relevant contact person of a customer, direct call numbers, mail addresses and contact classification fields |
| Activity | All activities with customers and contacts can be described with fields of this entity. Customer visits, letters, e-mails, inquiries, quality issues. Activities are compareable with calendar entries. They have classification fields,a subject, date fields and a formatted memo text field available. |
| Project | With Project entitities from the same context are grouped together. For example a project can help to get quick data access in situations, if more than one account or contact is involved and a lot of activities, orders and quotes for different products have to be considered. |
| Quote | Classification data for quotes, like ID's, valid until date, issue date, quote types and memo text. |
| Order | Classification data for orders or contracts, like ID's, issue date, order types and memo text. |
| Invoice | Classification data for invoices made for orders, like ID's, issue date, invoice types and memo text. |
| Purchase | Classification data for purchase orders of a company, like ID's, issue date, purchase order types and memo text. |
| Product | Products are the articles and services, that are offered by some company. All product relevant data, like ID's, product-names, material-names, standard prices and other classification and description data can be managed here. |
| Discount | customer price lists and other standard price reduction methods can be handles with Discount, volume discounts, price groups, price lists for special periods |
| Position | Positions represent the connection between products assigned to quotes, orders, invoices or purchase orders. For each product assigned, prices quantities and dates can be edited. |
| Textsettings | All text values of the application can be listed and edited here. It some kind of configuration and it will influence all systems, that are in the same language group. This entry is only visible with administrator rights or in test versions. |
Searching and Selecting Data in the Tree
General Search Aspects
A good search configuration is one of the most important aspects of user acceptance, because the data search is the base for all important tasks in the program handling:
- Get quick access to the right, pre-selected data
- View data from different viewpoints and entity combinations
- Get a quick data evaluation for different aspects directly in the treeview
- Search queries are the base of the reporting system
The search configuration should be adapted to the real practical needs of one organization and an optimization should happen steadily.
For each entity a specific search dialog is configured. The search criteria fields for these dialogs vary for each entity. The configuration of these dialogs depends in a high degree on the specific requirements of an organization and it should be frequently adapted by customization operators at specific needs.
All fieldtypes entities, except memo text fields are search able in the dialog (normal text, number fields, date fields, classification fields (combobox-fields) ).
For enterprise databases fulltext search is available. If a table contains a configured fulltext index, the search can also include memo and formatted memo text fields into the search results.
Direct Search
 .
.
A Direct Search line is opening after clicking a top-level node, if direct search is configured for this node. For Direct Search, click the Search row and enter the search criteria directly in the treeview. If fulltext serch is available, this search will directly use the fulltext index and all records will be listed, if the search term is in one of the configured fulltext index fields.
 .
.
By pressing "Enter" all rows will be listed, which are valid for the search term.
Quicklist
 .
.
The Quick-List node of the treeview may contain a list of pre-configured search-nodes. By clicking one line a selection is automatically executed, without asking for additional criterias. All serach criteria are pre- configured.
This is the most easy way to get data listed in the treeview by criteria. All listed nodes will have the same behaviour as search entities by search dialog.
Search-Dialog
 .
.
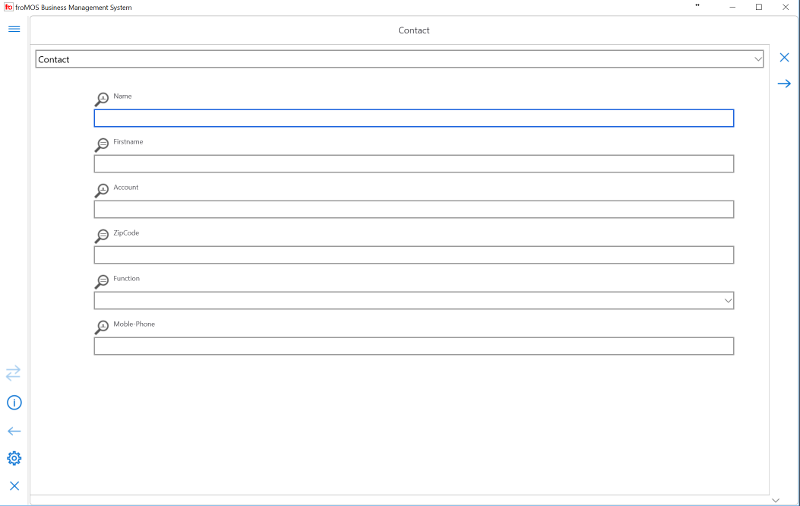
Start a new search by first selecting the entity to search for and second by pressing the "Search button" from the toolbar. A search criteria dialog will open for the selected entity. If the actual selected tree item is a sub-tree entity, like an account, assigned to a contact, the opened search criteria dialog is searching top level entities, in the sample case contacts.
 .
.
The picture at the top of each criteria field in the dialog indicates the type of search-field, that is configured for this field. The following possibilities are available:
 Compare text-fields against an configured
fulltext index that may contain memo fields.
 Compare text-fields, the search term can occure at any place of the text field.
 Compare text-fields, the search term must be equal with the beginning of the text
field.
 Compare any kind of field, the search term must be equal with the field.
 Compare any kind of field, the search term must be
bigger with the field.
 Compare any kind of field, the search term must
be smaller with the field.
 Compare any kind of field, the search term must be unequal with the field.
According to the search type of one field the resulting data is influenced. For example text field search will find the data rows with text at any position of one column or the text must be equal with the beginning of one column.
In the configuration of one search declaration is fixed, which enties are included in the search. It can be only one single entity, like an activity. But also a combination of entities can be configured. All available pre-configured search combinations with fields can be accessed from the combo-list at the top of the search dialog.
If additional search combinations are available, they can be selected from this top combo-list and the dialog is adjusted with the search fields of the selected sub-dialog.
Missing search combinations can be customized by system administrators.
In any case finally only items from the actual selected top level entity will be listed, also if the search combination is made over many different entities.
For example, if an top level activity search is configuered as combination of activities and accounts, the result will only list activities, but maybe a search was restricted over a ZIP Code area from accounts, only activities in the select ZIP code area will be listed.
Data is only listed, if the users usergroup has access rights for the data assigned.
The naming for each search configuration in the combo-list should give the user an impression for the used entity combinations and its possible results.
For example: Quotes for accounts, Orders for products, Planned orders etc..
Add Entity Data in the Tree
 .
.
If entity data is listed in the tree, the listing for a sub node is starting with a "New" line. By clicking this "New" line the application is opening the standard edit form for the actual entity. New entity data can be inserted in this form and finally the new filled data entry is saved by pressing "Save" button inside the form.
The new entry is only created by saving the form. Only closing the form will result in nothing, no new entry is created. If data was entered in the new form a hint will come, that the data is not saved, but only if the "Save" button will be pressed, any new data is written.
If the treeview does not contain a "New" line for the actual node, maybe because some other new entry was
created before a "New" line entry can be inserted by pressing the "Add" button
 . Repeating the select will also create a sub
listing with a starting "New" line.
Delete Entity Data from the Tree
First select the entity data line of that entity which should be deleted and after this press "Delete"
button  .
If the "Delete" button is placed in the second line of the toolbar, the toolbar can be toggled by
  to get the "Delete" button accessible.
If the actual selected data line is in the top level node list of the treeview, the entity itself will be deleted, if no other data is referencing this entity. If for example an account should be deleted, this will be only possible, if no order or any other entity is assigned to that account.
If the actual selected data line is from a sub level node list of the treeview, only the assignment of that entity is deleted, not the entity itself. So if a order is deleted, that is assigned to an account, inside the account the assignment for this order is deleted. But this order is still selectable from top level order select, because the entity is not deleted, only the account assignment.
Assign existing Entity Data to Treenodes
As base principle of the froMOS CRM system, entities can be assigned to other entities. This assignment is represented by the treeview in the way, that each sub-node listed below a top node is representing a detail for the top node, for example orders of a customer or accounts, that are assigned to a contact.
 .
.
If entity data is listed in the tree, the listing for a sub node is starting with a line, that contains only the name of the sub-entity. By clicking this name line the application is opening an entity assignment window. In this windows the entity, that should be assigned to the actual top level entity, can be selected.
 .
.
A list is opening, containing all entities that are assignable. To make an assignment check the relevant checkboxes of entity lines to be assigned and press the "Select" button.
Entities can be searched by criteria entered in the search field. Each time the "Enter" key is pressed, the next matching entity is scrolled. If a quick add dialog is configured, a new entity line can be created by enter the "Add" button.
With the top right combobox list a new selection of entities can be loaded, if the combobox contains any entries.
New assignments can be also realized by drag'n drop. Therefore open the source and the target item in the treeviw. By draging the source item with drop above the target item, the source item will be assigned as sub-node to the target item.
Pin Down Treeview Entity Data Nodes
Treeview entity data nodes maybe copied at the bottom of the tree by the "Pin Down" button
 ..
..
Doing this, a copy of the actual selected data node is assigned at the bottoms top level of the tree.
In this way the data from specific selects can be saved for later work.
With the "Pin Down" action the last pinned node becomes an internal selected state and a following task will refer to this data as reference. For example linking documents, assigened to other data nodes to this pinned down node.
Edit Treeview Entity Data Entities
Enter Edit Form
Edit treeview entity data nodes by the "Edit Mask" button
 .
For each entity a specific data entry form is configured, which is open by "Edit Mask" button click.
Edit Form Structure
The edit form may contain different types of input fields in a one or two column arrangement.
The input fields can be placed in one or more switchable panels.
Edit Form Field Types
The form provides the following edit field types:
| Entity-Name | Description |
|---|---|
| ID-Fields | These are read-only fields. By saving the form a value will be automatically created for this field. The format of auto created fields is customizable and would be set by system operators. Different formats are possible for ID's or product EAN for example. |
| Text |
Normal text field for single line text to enter names
and ID's and other description fields
 |
| Number |
Number fields for editing currencies, quantities and
other number fields
 |
| Date |
Edit dates with calendar and calendar weeks support
 |
| Combobox |
With this type of fields a list of classification entiries is provided and they can be set from
inside this list. List entries can be added or removed by Ins/Del keyboard key, if this
functionality is assigned for
the
user.
 |
| Reference |
Show's referenced entity data, like the customer name of a contact. New assignments can be made
by the field included button inside the assignment dialog.
 |
| Memo | Multi row text field for longer description text |
| Formatted Memo |
Multi row text field for longer description text and text formatting options
 |
| Grid |
List and edit a table of sub-entities, like positions for orders. New sub-entities can be assigned, by click the summary row. Checked entities can be re-calculated ("Calc" button) or deleted ("DelPos" button) inside the grid. A grid can be configured as readonly grid. With the "Save" button, prices of checked rows will be re-calculated on standard discount lists and product prices of the actual customer. All directly entered prices will only be saved, if the row is not checked. For checked rows all manual entered price-data will be overwritten.  |
Edit Form - Closing and Saving
Any changes in the edit form will be saved by "Save" button. Close the form with the "Close" button.  According to configuration a "Close" button can combine close and save or provides only a single exit from
the form without saving. A hint will come before closing, if unsaved data exists.
Edit Form - Read Only State
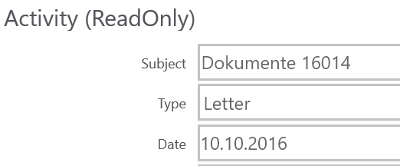
Readonly state can be set manually by pressing the "Read Only" button  .
.
Edit Form - Copy Entity Data
For an open data record the existing data can be copied into a new record by pressing "Copy" button  .
The edit form is changing into copy state and new record with copied data can be created by pressing
"Save" button finally. Use this procedure for example to copy an existing product to a new one, if you
like to insert a
second
comparable product.
Reports
froMOS BMS is including a full reporting system. All selectable data can be transformed into special formatted reports. This reports can be directly printed or exported as PDF.
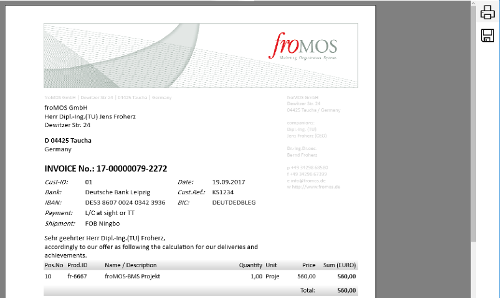
For enterprise systems an report creation can be done automatically in the background by workflow processes with user notification.
 .
.
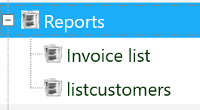
General Reports, which are valid for more than one entity are available as top-level treeview node. This node contains all configured reports for the actual organization. The report can be created by clicking the line of the report. The report will be shown in the reports preview dialog. Additional report criterias may be ask before report creation, for example a zip code for customers to list.
For each entity the available reports can be selected below of one entity by clicking the "List Reports"
 .
button.
The reprots are created in the same way as general reports, described above.
Adding Notes for Tree Data Entities
Notes are short remarks, attached to some specific data entry. Notes are available for the main entity types (account, contact,activity,product,quote,order purchase,invoice).
The example of an activity entity is intended to illustrate the meaning of notes. An activity can be used for documentation of specific cases. Mostly the processing of cases can be parted in main step and small and secondary steps. Main steps like meetings, a contract description or other important steps should be described by new activity entries, because in this way also state information, which is relevant for search can be managed.
For all steps between, notes are the quickest way to save information remarks. For example it maybe an important information, that someone has called the customer, but he was not available. This short note may help a colleague and if you see many times the same short message, one can draw his conclusions from it.
Each time a note is saved, it is automatically saved together with its author and issue date.
If one entity has notes assigned and this entity data line is one time clicked in the treeview, the assigned notes will be listed as sub-nodes in the tree for reading purposes only.

Each assigned note is listed with issue date, subject, memo text and if available a small picture of the author of the note. In this way it is quickly obvious, who has made, which remark inside the discussion.
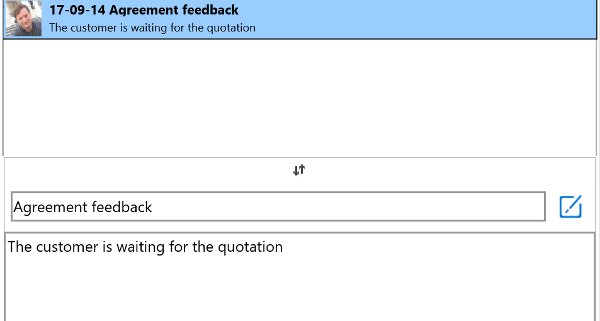
By the "Notes" button  notes can be easy attached to one
entity.
A notes panel is opening for the actual selected tree node data entity, listing all still existing
notes for that entity in the list at the top of the panel.
Existing notes can be edited by the authors of a note. If one entry in the top list is clicked, it is open in the below input form. The author of a note will have an "Edit" button available, for saving back all changes.
New notes can be assigned by filling the empty input form in the bottom area with final save by "Add" button, which is available for each empty notes-edit-form.
For enterprise versions of froMOS-BMS a full cloud based message collaboration client is available for subscription. This cloud based service offers messaging functionality based on MQTT protocol for any notes, assigned to entities. For example one can assign to an specific entity, to get attached to its notes queue, to be automatically informed about any change and getting its own notes setup for this queue.
Document Management
Main Aspects
For all main treeview entities, documents of any type can be assigned. These documents will be stored in the normal file system of the operating system. The froMOS system database will store only links to these documents. The size of storable documents can be restricted by configuration (default: 50MB);
Additionally an automatic synchronization with an cloud storage area will happen, if this feature is configured. Cloud access is only available for enterprise versions of froMOS BMS. For cloud synchronization, all documents will be signed and encrypted automatically in the background and transfered between cloud and local system by secure and encrypted connection. (SFTP/HTTPS or direct link copy).
German Law - GOBD Requirements
A storage age requirement can be automatically assigned for documents stored in the cloud (default 10 years), but it can also be assigned to one document by toolbar function manually.
This document management concept ensures in an easy way the German law requirements of GOBD for saving documents and e-mail. The required technical prerequisites for immutability and retention period of documents in the storage are implemented with this concept, under consideration of the GOBD's law principles.
Document Exchange over the Internet
The encrypted saving of documents in the cloud is also the base concept for document exchange inside and between organizations over the internet. In this way only the document links inside a database have to be synchronized between different databases.
If the document is required locally on any other system, it is first checked, if the documents is already stored locally and if not, the user is asked, to load and decrypt this document from cloud storage. Document links are only available, if the user has access rights for the link owning entity.
In this way documents will be only exchanged by secure connections. In compare, a document exchange by mail with attachments is unsecure, because it is not in general ensured that the connection between e-mail participants is encrypted. So with e-mail, documents may be become visible for third parties.
Such possible information leak is critical, especially if an confidentiality for data exchange is requiered between parties.
Operating Documents
List Linked Documents
If an entity has documents assigned, they can be listed in the treeview as sub-nodes of the entity by
"File" button  .
.
If documents have been assigned to one entity, the document links will be listed in the tree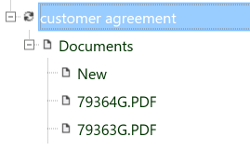 .
.
If the document link is clicked in the treeview, the title column of the link description can be overwritten. The edit mode is set by clicking again the title column and the changes will be automatically saved by clicking a different treeview line. The document link is assigned to special toolbar buttons for linking and opening documents.
Add Documents
Add new documents by "Add File" button  .
.
In the file open box one or more files can be selected. The files will be first copied to the configured local file storage place and after this, they will be encrypted and transfered to the configured cloud storage area. All processing happens as background operation.
The actual processed file is listed in the statusbar of the application. Finally an information about successfully transfered documents is created by operation system messaging system. The application is available for other tasks, while operating documents in the background.
Instead of using "Add File" button, it is also possible to add documents by dragging files from the operating system file explorer on the target entity in the application treeview.
Open Linked Files
A linked document can be opened by "Open File" button  .
.
The "Open File" button becomes available if a document link is clicked, that is assigned to one entity.
If a document is already stored locally, it will be opened directly. If the document is not available locally, the user is asked to load this document from cloud. If the user is confirming this, the document will be downloaded and decrypted as background process.
Finally the document will be opened by the operation system configured method of the document type.
Link Files to other Entities
If a document is already stored in the froMOS-CRM system, it can be necessary, that the same document is available in more than one context.
For that reason, already assiged documents can be linked to other entities in the tree. The documents are stored physically only one time, but they can have more than one link to entities stored in the database finally.
To get a document linked to an additional entity, first Pin Down that target
entity.
A new link to the pinned entity is created by "Link File" button  , which is available on a linked files toolbar.
E-Mail Integration
E-Mail integration is only possible in enterprise versions of froMOS-BMS for any POP3 or IMAP mailbox.
Sending E-Mail
The data structure of activity entities is compatible with the structure of e-mail's. By "Send" button
 an activity entity will be transformed and transferd automatically to the actual configured OutBox of the
user.
The e-mail will contain the subject, html-body text as well as all linked files as attachment from activity entries.
CAUTION: For ensuring security, better to use program internal communication possibilities as dataexchange or message and document collaboration options, if possible. E-Mail should only be used for communication with parties, not included in the programs message queues.
By pressing "Send" button a dialog for selecting target email addresses is opening .
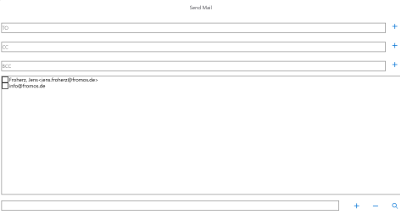
Set the email recipients in the relevant fields for TO/CC/BCC directly and use ; as separator for more than one mail addresses per line.
Checked entries of the mail address list will be assigned to TO/CC/BCC by "+" button at the end of edit field.
The mail address list contains automatically all contacts, assigned to the selected activity and additionally all manually assigned addresses (by "+" buttom at the botton). With the search button (bottom of dialog) contacts from other entities can be temporary selected in the address list.
Confirming this dialog with "OK" button will directly send the email from the configured outbox. Abort from sending email by "Cancel" button.
List E-Mail in Treeview Structure
In the treeview top-level one node for mails can be configured. This node my contain a list of sub-nodes, referencing all mailboxes of the underlying mailsystem, that should be available in froMOS-BMS.
By clicking an e-mail sub node the content of the connected mailbox will be listed in the treeview struckture. By doing this, e-mail gets available for importing and assinging to entities.
Import E-Mail - Assign to Entities
E-Mail Import is only available from enterprise editions of froMOS-BMS. Next to the manual import options, specific automatic import options exist. This must be done individual for each organzitation. froMOS will provide an individual quote for automatic extension.
Mails will be imported as activities and can be assigned to all entities in the tree, which also have activity sub-entities.
The mail can be assigned by drag&drop of mails listed in the treeview. The mail will be assigned to the target node, on which it is dropped.
E-Mail can also be imported by "Mail Import" button  .
Doing this, first click the mail to import in the treeview list. In this way, the mail is marked. As
second step, click the "Mail Import" button, which is available for the target node.
If no mail from the treeview is marked, if the "Import" button is pressed, the system is first selecting all mail entries of the actual INBOX below the actual treeview antity and the user is requested to select one e-mail as source for import.
Pricing and Discount-Lists
General
Defining of discount groups is only available in enterprise versions of froMOS-BMS.
Price calculation in quotes, orders and invoices is based on price information assigned to products. Three fields of a product entry are relevant.
- Gross-Price
- Net-Price
- Tax
Tax should be set to the required governement tax percent amount, but this tax amount can be overwritten in any quote,order or invoice.
Gross Price is the final price including tax. The net-price is automatically created for each change of gross price and tax. The net price field is realonly, because of this automatic calculation. The net price is saved in the inernal database with full decimals for calculation purposes.
Price calculation is also based on discount lists. These lists can be assigned to account entities and they are valid for specific product groups or products as well for a certain period of time.
A discount group can be assigned to an account by selecting the discount group in the edit form of the account. The available groups will be listed in the discount group combo-box field.
If an discount group is assigned with an account (one discount group may be assigned to only one or more than one accounts), the settings for this group will be the base of price calculation for products assigned to quotes, orders or invoices.
Discount lists and its content can be added, selected, changed and copied from the top-level treeview node
discounts
 .
This option is only available for froMOS-BMS enterprise versions.
All discounts are grouped in specific lists by DiscountID identifier. A standard group is defined for each empty system.
By setting this DiscountID in the edit form for discounts, one single discount definition is assigned to a discount group. New discount groups can be created, by adding a new entry in the DiscountID combobox field.
In a single discount a percent value can be set. This percent value will be multiplied with a products price value. If a FixedPrice is set, this is overwriting any product price and percent calculation.
Discount prices will be only calculated, if a discount is assigned to a ProductGroup or single product.
If a ProductGroup and also a Product is assigned to an account, the product assignment overwrites the productgroup setting. This means,the discount is valid for all products, that have assigned the productgroup, but the product with its single discount assignment will overwrite the settings of the discount, which is assigned to a productgroup.
If a minimal or maximal quantity is set inside an discount, the discount will be only calulated, if the quanitity requirements exist.
A comparable restriction can be set for a valid period or time for one discount.
Copy Discount Lists
First select an discount entity in the treeview. After marking this entity in the treeview, the "Copy" button is available.
Pressing the copy button, a message dialog is opening, with a param string, preset values of the selected discount node.
The values between the param marks for example @NAME@ can be adjusted.
@NAME@CPS2017_1@NAME@
@DATEFROM@01.02.2017@DATEFROM@
@DATETO@01.01.2019@DATETO@
@QUANTITYFROM@0@QUANTITYFROM@
@QUANTITYTO@0@QUANTITYTO@
@TIMEFROM@0@TIMEFROM@
@TIMETO@0@TIMETO@
A value have to be inserted between param marks, one mark at the beginning of the value and the same mark at the end of the value
Copy process will only take over the records with the same quantity or period settings.
In this way a discount list can be copied for a new year period for example. All values inside the old period of the selected discount group, will be set to a new period or quanity setting.
@NAME@ - Leaving the preset value will copy all discount lists entries to the same existing list. With an new value for name, a new DiscountID is created for this name, or if already exist assigned.
The time, period and quantity settings of the new list entries will be taken from the other param marks (QUANTITYFROM/QUANTITYTO, TIMEFROM/TIMETO, DATEFROM/DATETO)
The new entries will be created finally and can be used or modified after this.
Queues - Information Flow
All main entities like accounts, contacts, activities, products, orders quotes, invoices can be assigned to queues. Each user will have a personal queue containing only entities assigned for that user. These assigned entities can be listed in the treeview from the top level node "Queue".
 .
.
Inside the queue node, all entity nodes will be listed which have been assign by other users inside one users queue.
That means, if an entity is assigned inside this list a task according to this entity is requested from the user. The awaited activity is normally known by the user. It can be only some review of data or some activity like creating a quote. After finishing the task, the entity can be removed from the queue or it can be assigned to some other users queue.
An entity can be assigned to only one user or to a whole user group.
To assign an entity to a user or user groups queue, open the assignment dialog by "Queue" button  for an
selected entity.
A list of available users and user groups will be shown. Select one user or group to assign the selected entity to the user or group.
To remove one assignment inside the queue, open the assignment dialog for an entity, that is assigned inside the personal queue. By pressing the assign button inside the dialog without selecting a new user or group, the entity is deleted from all queues. If the entity was assigned to a group, it is deleted for all users queues of that group.
If a new user or group is selected before the entity is moved in the new queue. For example an entity was in the queue of the user to create some quote and another user as to confirm this quote, the quote entity would be put in that confirming users queue.
CAUTION: By assigning data to a users queue, the data access to that entity is assigned and the user will become user rights for that entity, also if the entity is normally not available for that user group!!!! For quotes, invoices, orders, activities also the contact-, account- and product- entities, assigned to that single quote/invoice/order/activity are also included with readonly access.
Data Exchange - Synchronization
froMOS-BMS can be installed on base of an embetted database at mobile clients like I-Phones,I-Pads, Android Systems or Windows Mobile or Desktop systems. To exchange all data with an central enterprise database, data synchronization is done.
Data exchange is available for enterprise systems to synchronize a users local database with a central network system database or cloud database.
The exchange can be started by pressing "Exchange" button. The synchronization process is running as background operation. An existing internet connection is needed to synchronize over a secure internet connection.
The exchanged data is selected according to the user rights of the requesting user. Only data for which the user is legitimated is selected from the central system.
Data exchange has to be configured by system administrators for getting available.